Getting Started
This guide will take you through the process of deploying an app via Runway.
Bootstrapping
Section titled “Bootstrapping”Follow these steps to deploy an initial “Hello World” style app with Runway. This will ensure that any changes that follow are applied on a stable foundation (i.e., a successful initial deployment).
Create service repository
Section titled “Create service repository”A service repository is where the source code for your app lives, where your Docker images are created/pushed, and usually (see note below) where the Runway configuration files are defined.
Container registry must be enabled.
If you do not yet have a service repository created for your app, go ahead and create one.
Create Dockerfile
Section titled “Create Dockerfile”Let’s create a simple one-line Dockerfile in your service repository to build an image:
FROM registry.gitlab.com/gitlab-com/gl-infra/ci-images/nginx-runway:latestBuild/push Docker image
Section titled “Build/push Docker image”Now that we have a Dockerfile in place, we can create/update your service repository’s .gitlab-ci.yml to build/push images:
stages:  - build
include:  - project: 'gitlab-com/gl-infra/common-ci-tasks'    ref: v2.73.0    file: 'docker.yml'
build:  stage: build  variables:    DOCKER_DESTINATION: ${CI_REGISTRY_IMAGE}/app:${CI_COMMIT_SHORT_SHA} # replace "app" with another name, if you wish    # DOCKER_BUILD_FILE: Dockerfile.nginx # defaults to Dockerfile  extends:    - .docker_buildx_base  rules:    - if: '$CI_COMMIT_BRANCH == $CI_DEFAULT_BRANCH'
Go ahead and merge this change. You should see a container image called app get built and pushed to your service repository’s container registry, which we can deploy using Runway.
Create Runway configuration files
Section titled “Create Runway configuration files”In your service repository, create a .runway/runway.yml file that looks like this:
apiVersion: runway/v1kind: RunwayServicemetadata: name: <VALUE> # your hyphenated service name department: <VALUE> # https://handbook.gitlab.com/handbook/company/infrastructure-standards/labels-tags/#gitlab-department-gl_dept department_group: <VALUE> # https://handbook.gitlab.com/handbook/company/infrastructure-standards/labels-tags/#gitlab-department-group-gl_dept_group owner_email_handle: <VALUE> # https://handbook.gitlab.com/handbook/company/infrastructure-standards/labels-tags/#owner-email-handle-gl_owner_email_handle product_category: <VALUE> # https://handbook.gitlab.com/handbook/company/infrastructure-standards/labels-tags/#gitlab-product-category-gl_product_categoryspec: container_port: 80The metadata fields above are required. You will need to replace <VALUE> using the links that follow as a reference.
You will also need to create two more files, which can be empty for now:
------Commit/push the changes to the .runway/* files and move onto the next step.
Add workload to provisioner
Section titled “Add workload to provisioner”File an MR to add a new workload to the config/runtimes/cloud-run/workloads.yml file in the provisioner project:
- runway_service_id: your-workload # must be unique project_id: 123456789 # your service repository GitLab Project ID groups: - gitlab-org/your-group # members of this group will be able to trigger deployments exclude_name_suffix: true # omit adding random suffix to workload nameAs we did not specify a region, it will be deployed to us-east1 by default.
For bootstrapping purposes, you should not specify any other options. However, once you are ready to get your own app deployed, refer to the schema for all the possible options.
Once you’ve filed your provisioner MR, a background job will automatically trigger a Terraform plan. You’ll see comments from @gl-atlantis (Aquaman) containing the plan output.
When you’re ready, request a review from a member of the Runway team who can review and apply the changes:
/assign_reviewer @gitlab-org/production-engineering/runwayYour MR will be automatically merged by Atlantis after a successful atlantis apply, and you’re ready to move onto the next step.
Update job token permissions
Section titled “Update job token permissions”The following steps will allow your deployment project access to your service repository for the purposes of downloading artifacts (see docs). These artifacts are downloaded during the deployment process and contain your Runway configuration files:
-
Open Settings > CI/CD on your service project
-
Open the Job token permissions drop-down
-
In the CI/CD job token allowlist section, click on Add then select Group or project
-
Enter your deployment project:
gitlab-com/gl-infra/platform/runway/deployments/<workload name>
Update your .gitlab-ci.yml
Section titled “Update your .gitlab-ci.yml”We now need to update your service repository’s .gitlab-ci.yml to trigger staging and production deployments via Runway:
stages:  - build  - validate  - runway_staging  - runway_production
include:  - project: 'gitlab-com/gl-infra/common-ci-tasks'    ref: v2.73.0    file: 'docker.yml'  - project: 'gitlab-com/gl-infra/platform/runway/runwayctl'    file: 'ci-tasks/service-project/runway.yml'    inputs:      runway_service_id: your-workload      image: "$CI_REGISTRY_IMAGE/app:$CI_COMMIT_SHORT_SHA" # Replace "app" if you used a different name      runway_version: v3.61.13 # Replace with latest version: https://gitlab.com/gitlab-com/gl-infra/platform/runway/runwayctl/-/releases
build: stage: build variables: DOCKER_DESTINATION: ${CI_REGISTRY_IMAGE}/app:${CI_COMMIT_SHORT_SHA} # DOCKER_BUILD_FILE: Dockerfile.nginx # defaults to Dockerfile extends: - .docker_buildx_base rules: - if: '$CI_COMMIT_BRANCH == $CI_DEFAULT_BRANCH'Testing
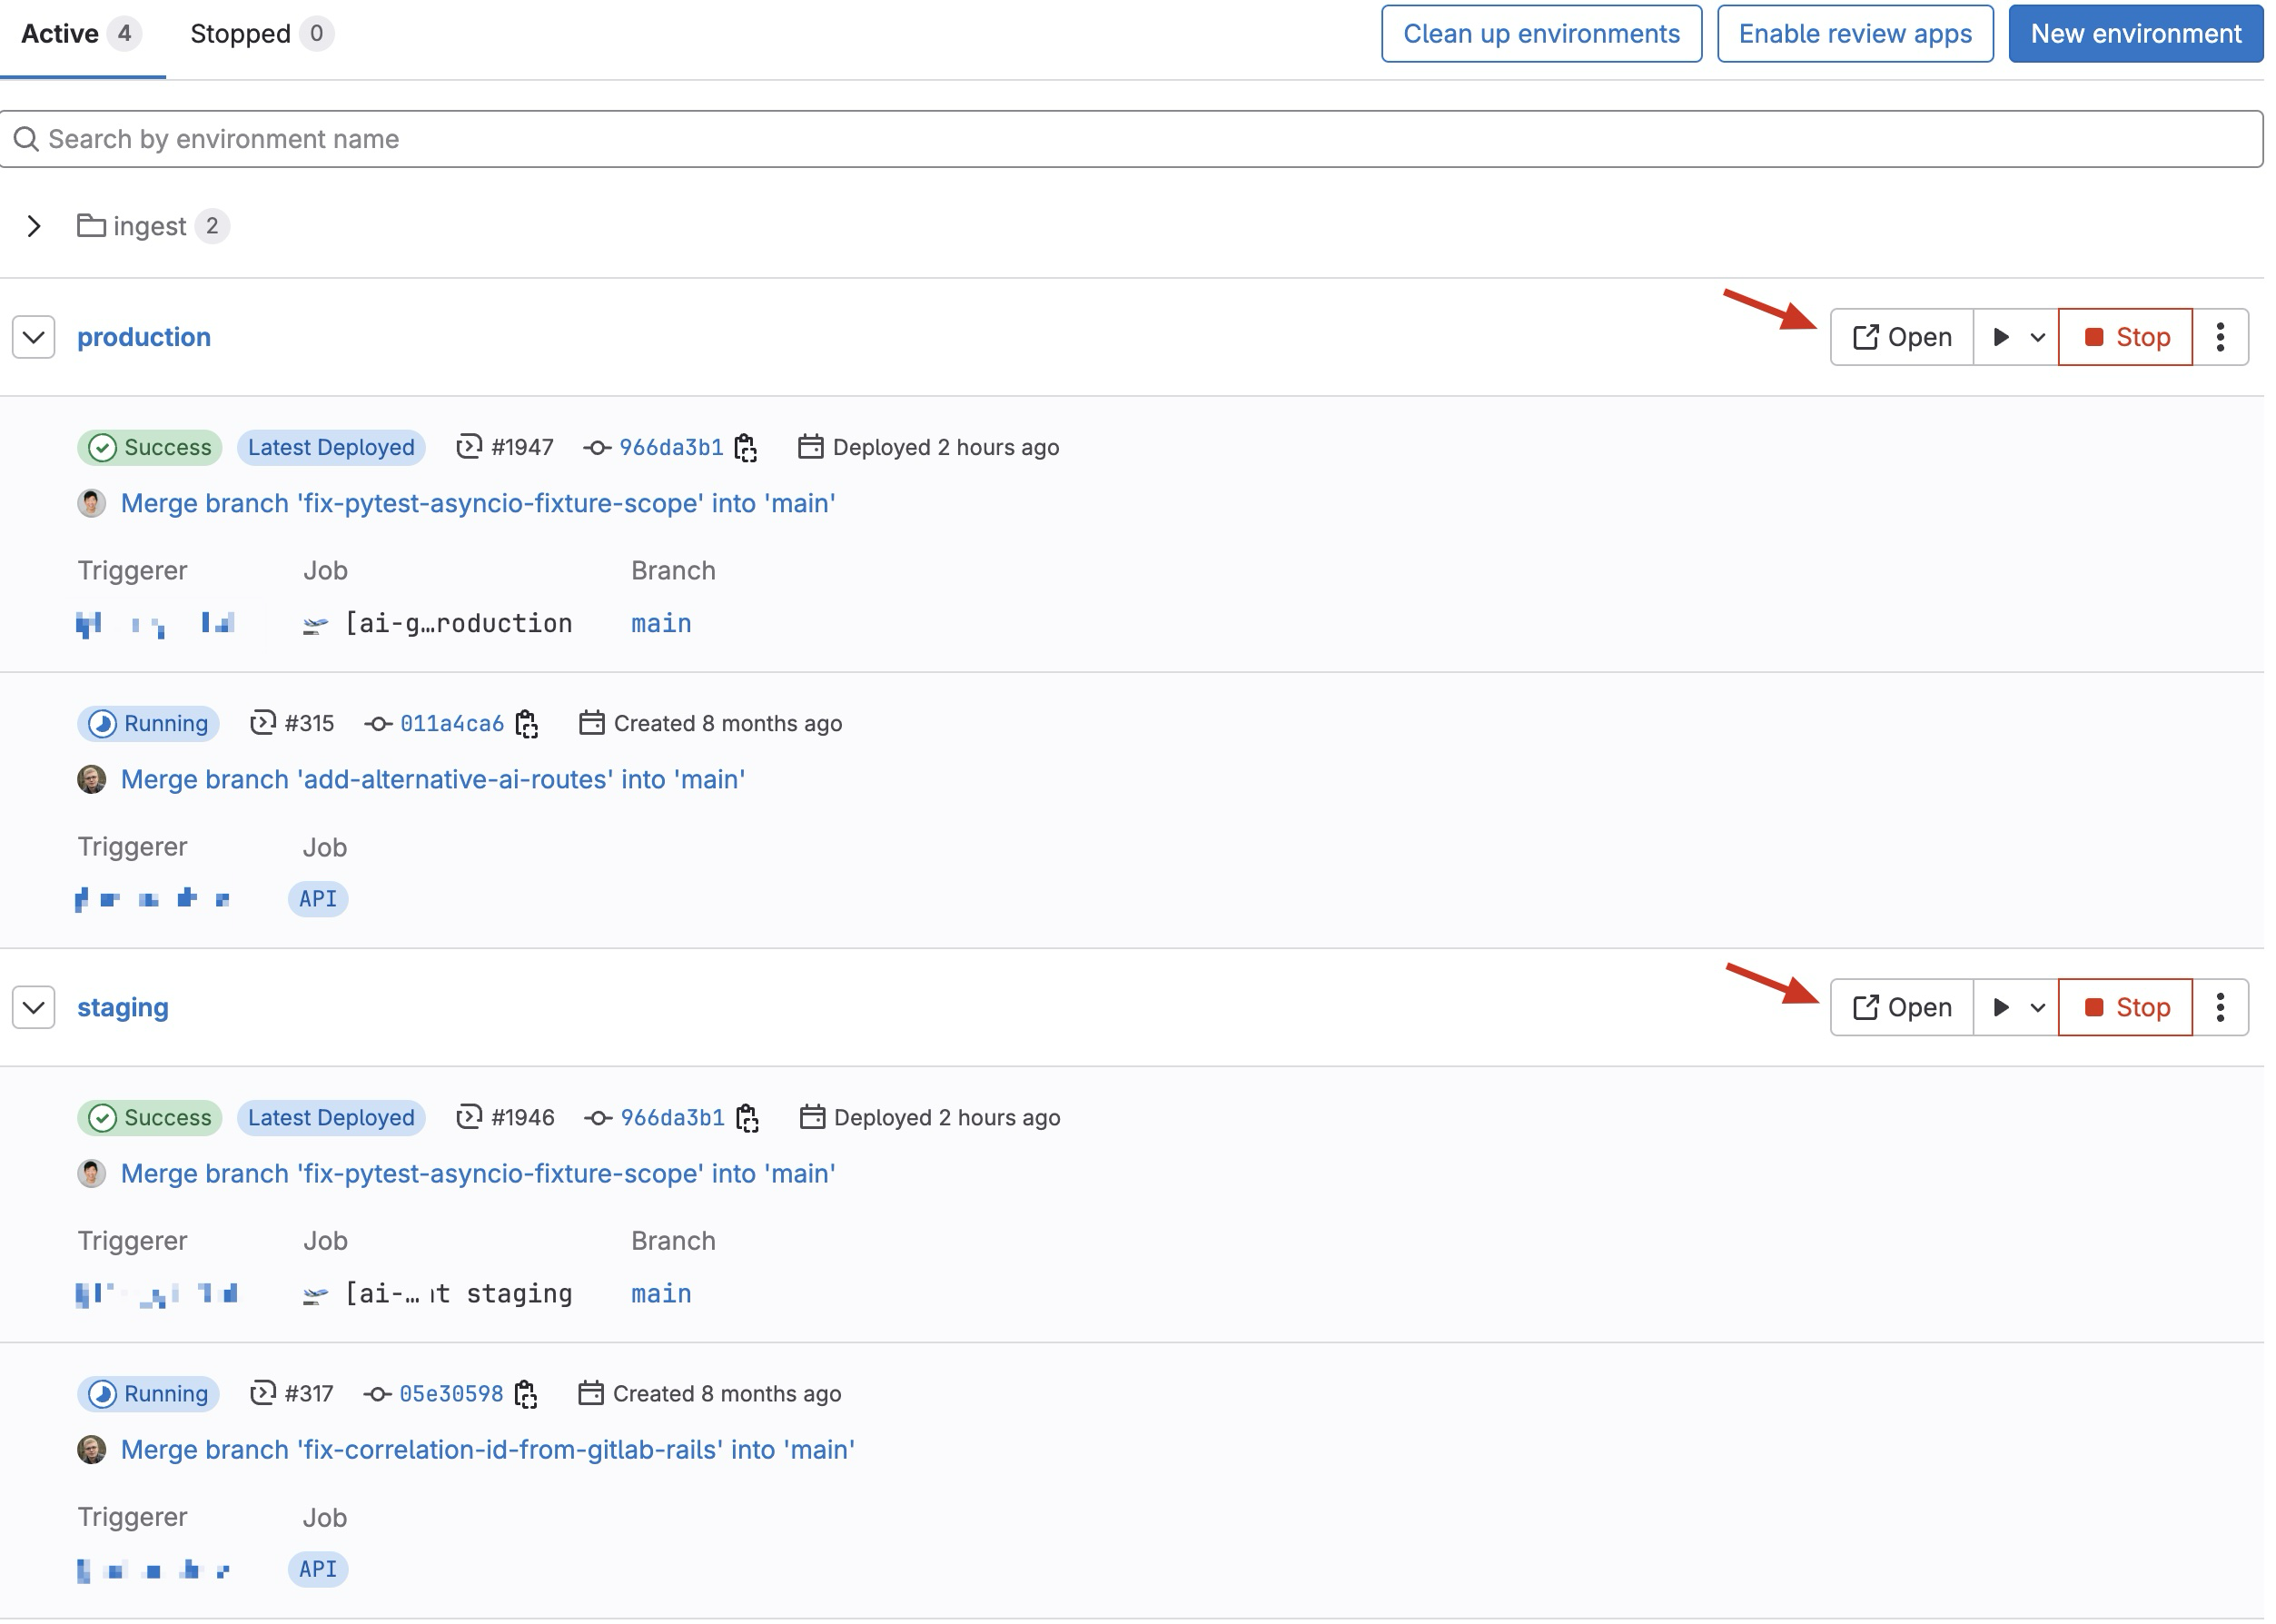
Section titled “Testing”We are ready to access your workload’s endpoint and check if it’s working!
The best place to find the links to access your environments (once they have been deployed) is through Operate → Environments in your service project.
In there you should see two environments, staging and production.
Clicking on the Open button will take you to the URL to access that environment:
Congratulations!
Section titled “Congratulations!”If you were able to access your staging and production endpoints, then you have successfully bootstrapped your workload!
You can now make changes to deploy your own app.
Deploying your application
Section titled “Deploying your application”Now that you have a working Runway workload, you can go ahead and make changes to get your app deployed.
Update Dockerfile
Section titled “Update Dockerfile”Customize your Dockerfile to build your application according to your specific needs. Feel free to adjust the build process as needed for your project requirements.
Update Runway configuration files
Section titled “Update Runway configuration files”The contents of the Runway config file depends on the type of workload you are deploying:
-
RunwayService: this type of workload deploys a Cloud Run Service. You can configure the service with an external and/or internal load balancer.
Example: the service deployed during bootstrapping is a
RunwayServicethat runs nginx and serves a Hello World style page. -
RunwayJob: this type of workload deploys a Cloud Run Job, which can be configured to trigger on a schedule or on-demand via CI.
Example:
woodhouse-handover, which creates an EOC handover issue at set times of the day.
Location
Section titled “Location”Reconciler checks for config files in this order:
- First looks in
.runway/<runway service id>/directory - If that path doesn’t exist, it falls back to checking in the
.runway/directory
This creates a hierarchy where service-specific configurations (in the service ID folder) take precedence over general configurations in the main runway folder.
Example tree structure for running a single deployment:
Directory.runway
- runway.yml
- env-staging.yml
- env-production.yml
- .gitlab-ci.yml
- … etc
Example tree structure for running multiple deployments:
Directory.runway
- runway.yml
- env-staging.yml
- env-production.yml
Directoryapp-backend
- runway.yml
- env-staging.yml
- env-production.yml
- .gitlab-ci.yml
- … etc
In the example above, when running a deployment for Runway service ID app-backend, it will use the config files under
the app-backend path, however deployments for any other Runway service ID will use the config files under .runway/.
Alternatively, to be explicit, you could also make it look like the following and it will have the same effect with the
exception that deployments for any other Runway service ID will fail because there is no runway.yml (nor env-*.yml)
file in the .runway/ directory:
Directory.runway
Directoryapp-frontend
- runway.yml
- env-staging.yml
- env-production.yml
Directoryapp-backend
- runway.yml
- env-staging.yml
- env-production.yml
- .gitlab-ci.yml
- … etc
Once you have your config files in the right places, scroll down to read the section on updating your project’s
.gitlab-ci.yml to trigger multiple deployments.
Stage-specific runway.yml
Section titled “Stage-specific runway.yml”If you only have a single runway.yml file then it will be used for all stages (i.e., staging, production). You can, alternatively, create
different Runway config files for each stage by defining runway-<stage>.yml.
Example tree structure might look like this:
Directory.runway
Directoryapp-frontend
- runway.yml
- runway-staging.yml
- env-staging.yml
- env-production.yml
Directoryapp-backend
- runway-production.yml
- runway-staging.yml
- env-staging.yml
- env-production.yml
- .gitlab-ci.yml
- … etc
-
In the
app-frontendservice above, the production deployment would userunway.yml(as there is norunway-production.yml) while staging would userunway-staging.yml. -
In the
app-backendservice above, we are being explicit by defining a config file for each stage (runway-staging.ymlandrunway-production.yml). Runway currently supports two stages (stagingandproduction). It is your choice whether to be explicit or not, however we do recommend being explicit purely from a future-proof perspective so that if Runway ever supports more stages, they will not accidentally use yourrunway.ymlfile.
Manual production deployments New in v4.17.3
Section titled “Manual production deployments ”By default, Runway automatically deploys to production whenever changes are merged to your default branch. If you need to manually trigger production deployments instead, set the RUNWAY_PRODUCTION_AUTO_DEPLOY variable to false in your service repository’s .gitlab.ci.yml:
variables: RUNWAY_PRODUCTION_AUTO_DEPLOY: falseMultiple deployments
Section titled “Multiple deployments”Runway seamlessly supports running multiple workloads from a single service repository. This flexibility is perfect for scenarios where you have a unified codebase—like a full-stack application with both frontend and backend components sharing the same Docker image—but need to deploy them as separate, independently-managed workloads in your environment.
To achieve this, you will need to add as many entries as deployments you need all referencing the same project ID. Example:
- runway_service_id: app-frontend  project_id: 123456789  groups:    - gitlab-org/your-group
- runway_service_id: app-backend  project_id: 123456789  groups:    - gitlab-org/your-group
Runway config and deployments in separate repo
Section titled “Runway config and deployments in separate repo”There are two ways the service project could be set up:
Runway config in service repository
Using this setup, every commit to the default branch of the service repository will trigger a Runway deployment pipeline in the deployment project.
The image can be configured with the CI_COMMIT_SHORT_SHA since the pipeline is triggered from the service project where the application Docker image is built.
Example: https://gitlab.com/gitlab-org/modelops/applied-ml/code-suggestions/ai-assist
Runway config in separate repository
Using this setup, the image input variable has to be updated to deploy the new version of the application. This grants the user a higher degree of control over each deployment.
Example: https://gitlab.com/gitlab-com/gl-infra/cells/topology-service-deployer
Environment variables and secrets
Section titled “Environment variables and secrets”See environment variables and secrets management.
Public vs Private
Section titled “Public vs Private”By default, your Runway service will be deployed with a public-facing load balancer accessible via:
- Production:
<service-id>.runway.gitlab.net - Staging:
<service-id>.staging.runway.gitlab.net
You can restrict access to your service by deploying it with an internal load balancer instead of an external one. This ensures only GitLab Rails can communicate with your service. Once deployed, your service will be accessible through the following endpoints:
- Production:
<service-id>.internal.runway.gitlab.net - Staging:
<service-id>.internal.staging.runway.gitlab.net
This is achieved by modifying your service’s runway.yml as per the following:
apiVersion: runway/v1kind: RunwayServicemetadata: ...spec: ... load_balancing: external_load_balancer: enabled: false # defaults to true internal_load_balancer: enabled: true # defaults to falseKeeping up with Runway releases
Section titled “Keeping up with Runway releases”Renovate is a tool that checks for new dependency versions and, if found, will periodically create MRs to upgrade them to the newest version. It is used extensively within “Infrastructure”.
The easiest way to keep up with Runway releases is to eenable Renovate CI or renovate-gitlab-bot.
renovate-gitlab-bot
Section titled “renovate-gitlab-bot”Enable renovate-gitlab-bot triggered merge requests on your project by following the instructions in the project README.
Add:
extends: [ "gitlab>gitlab-com/gl-infra/platform/runway/runwayctl:renovate-runway",],And ensure enabledManagers includes custom.regex.
See example in merge request 1160.
Renovate CI
Section titled “Renovate CI”Enable Renovate CI triggered merge requests on your service project by doing the following:
- Add
@glrenovatebotas aDeveloperon your service repository underManage > Members. - Add
runway-workloadsas a topic in your project underSettings > General > Naming, description, topics. - Set
RENOVATE_DISABLEDtotrueas a CI/CD variable if you are currently getting MRs filed byrenovate-bot.ymlfromcommon-ci-tasks
If you’re not already using Renovate, once you’ve added the runway-workloads
topic to your service project, Renovate
CI will be able to
discover your project and onboard it by opening a merge request like this
one.
If you have an existing renovate.json file, Renovate will not update it
for you so you will need to update the file yourself and add Runway’s Renovate config preset
to the list of base configs (i.e. the extends keyword). For example:
{ "$schema": "https://docs.renovatebot.com/renovate-schema.json", "extends": [ "gitlab>gitlab-com/gl-infra/common-ci-tasks:renovate-common", "gitlab>gitlab-com/gl-infra/platform/runway/runwayctl:renovate-runway" ]}This will look for patterns like runway_version: v2.40.0 in your .gitlab-ci.yml file and keep the version up to date.
Frequently Asked Questions
Section titled “Frequently Asked Questions”How do I roll back the deployment?
Section titled “How do I roll back the deployment?”At the moment the designed way to roll back a deployment is roll back a commit on the main branch, which will trigger a new deployment to Runway with the reverted code.
How do I view metrics?
Section titled “How do I view metrics?”By default, metrics are reported for all Runway services. To view metrics, you can use service filter on Runway
Service Metrics dashboard.
Recommendation: For additional features, such as custom service overview dashboard, alerts, and capacity planning, refer to the observability page.
How do I view logs?
Section titled “How do I view logs?”By default, application container logs can be viewed in Cloud Logging UI by filtering resource.labels.service_name to your runway_service_id.
To learn more, refer to the observability page.
How do I fix Terraform state error?
Section titled “How do I fix Terraform state error?”Insufficient permissions
Section titled “Insufficient permissions”When a pipeline is triggered with insufficient permissions, failed job includes following error message:
Terraform has been successfully initialized!Acquiring state lock. This may take a few moments...╷│ Error: Error acquiring the state lock││ Error message: HTTP remote state endpoint invalid auth││ Terraform acquires a state lock to protect the state from being written│ by multiple users at the same time. Please resolve the issue above and try│ again. For most commands, you can disable locking with the "-lock=false"│ flag, but this is not recommended.╵Error: failed to execute terraform command: exit status 1To fix, there are two potential options:
- Job can be retried by member with the required permissions, or
- Ensure your account has Maintainer privileges in one of the
groupsdefined for your workload inconfig/runtimes/cloud-run/workloads.yml.
Troubleshooting
Section titled “Troubleshooting”- If your deployment fails for any reason, check the deployment logs.
- If the downstream pipeline failed to be executed, there’s probably a permission mismatch.
Currently, a person triggering a deployment must have “Developer” permissions in the
runwayctl project and “Maintainer” permissions in
the generated deployment project
(example).
To grant additional permissions, update the config/runtimes/cloud-run/workloads.yml file in the provisioner repo from step 1.